 » Site Navigation » Site Navigation | | | | » Recent Threads | looove 04-16-2024 01:18 PM 04-16-2024 01:18 PM 0 Replies, 1,214 Views | | | lolita porn 04-13-2024 11:45 PM 04-13-2024 11:45 PM 0 Replies, 538 Views | lolita porn 04-13-2024 11:43 PM 04-13-2024 11:44 PM 1 Replies, 438 Views | lolita porn 04-13-2024 11:40 PM 04-13-2024 11:41 PM 1 Replies, 449 Views | lolita porn 04-13-2024 11:38 PM 04-13-2024 11:39 PM 1 Replies, 450 Views | lolita porn 04-13-2024 11:36 PM 04-13-2024 11:37 PM 1 Replies, 465 Views | lolita porn 04-13-2024 11:35 PM 04-13-2024 11:35 PM 0 Replies, 429 Views | lolita porn 04-13-2024 11:34 PM 04-13-2024 11:34 PM 0 Replies, 427 Views | lolita porn 04-13-2024 11:33 PM 04-13-2024 11:33 PM 0 Replies, 414 Views | |  |  |  | |  10-10-2008, 06:28 AM 10-10-2008, 06:28 AM | #196 | | NOBODY F's with the Jesus Join Date: Oct 2006 Location: Ventura California Posts: 7,824 | 
Haven't updated in a while. Ran into a problem getting the crank bolt off of the s52. My impact was not strong enough to loosen it and I needed to remove it to get the lower timing cover off to replace the timing cover gasket and crank seal. The thing was torqued to 300ft lbs and since it's on the engine stand, I had no way of locking the crank in place while I loosen the big ass bolt. Besides that, I didn't feel comfortable wrenching down that much pressure on the front of the engine since it's so long and is already putting alot of stress on the stand. God forbid if the thing were to fall or break off of the stand, I wouldn't be able to afford a new motor. So, how did I get it off you ask? First I supported the front of the motor with a floor jack and a block of wood. Then I borrowed a piece of steel from my trusty neighbor. Broke out the torch, cut a few holes and the rest was history. Basically, I made a tool with the help of my buddy/neighbor, which held the crank in place by pressing against the garage floor while we used a breaker bar to crack the bolt loose. So now that that's done, I'm one step closer to getting this thing done. Tomorrow I'll work on it for a little while(got a softball game), but I'll try to atleast get everything degreased and ready to put back together over the weekend. I'm going to have to take the motor off the stand to get to the rear crank seal, but that should go much easier. Spent a day cleaning the garage, building a parts shelf and organizing tools. I'll post more pics tomorrow, but here's some pics of my homemade crank bolt tool for now: 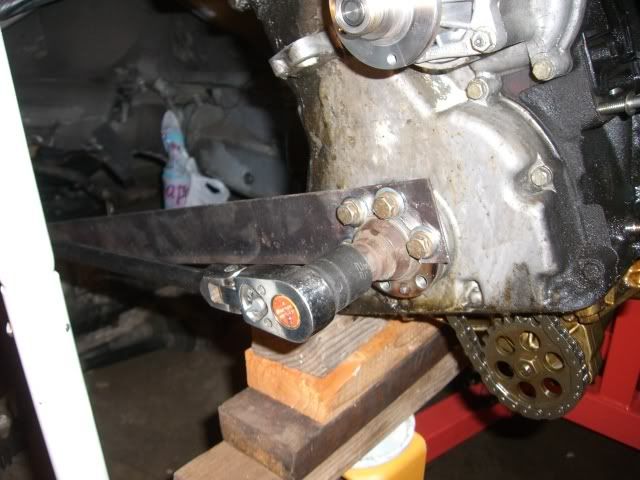 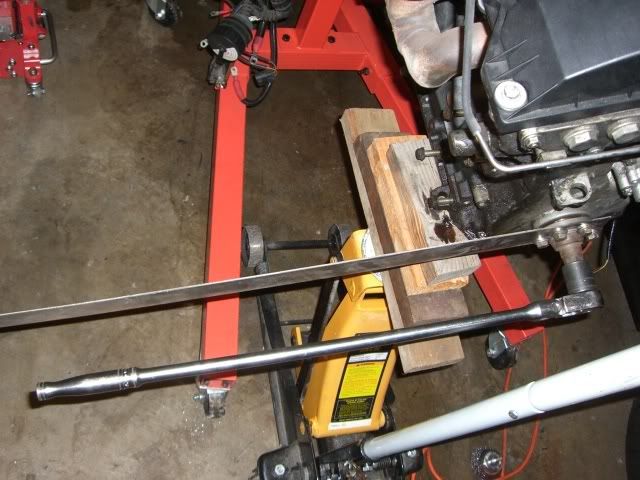 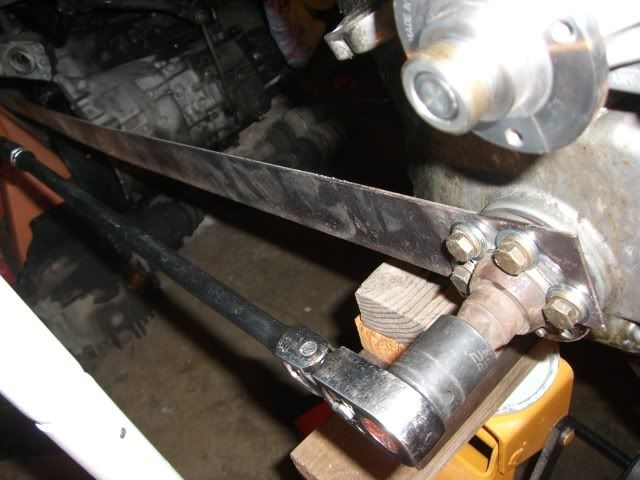 __________________ 4 MORE YEARS BABY!!! |  |  | | 10-10-2008, 06:35 AM | #197 | | Senior Member Join Date: Sep 2007 Location: SoCal Posts: 305 |
Jess Your a mad genius!!! __________________  | | | | | 10-10-2008, 06:57 AM | #198 | | NOBODY F's with the Jesus Join Date: Oct 2006 Location: Ventura California Posts: 7,824 |
Lol, I wouldn't go that far Noah. I could/should've just dropped the motor in and called it good, but I can't stand a greasy/dirty engine. Looks like the previous owner was using 0 weight oil and it was leaking from every seal. I'll be using 5-30 synthetic(a little thicker) and I'll have all new seals, so it should stay pretty clean. __________________ 4 MORE YEARS BABY!!! | | | | | 10-11-2008, 11:43 AM | #199 | | NOBODY F's with the Jesus Join Date: Oct 2006 Location: Ventura California Posts: 7,824 |
Oh Boy, well when i went to remove the lower timing cover I got some resistance. After removing the crank pulley, vibration damper and crank pulley hub, I removed the 14 bolts holding the cover on, pushed back the two dowl pins, removed the coils and valve cover, then removed the two torx bolts inside the valve cover under the VANOS unit going down into the cover, I still couldn't get the cover off. I read the Bentley manual several times and it just wasn't adding up. So I pull out the Haynes manual and it was very clear that there is a third torx bolt under the timing chain sprocket. It's actually the same bolt that holds the secondary timing chain guide. So now I have to remove the VANOS assembly, timing chain and timing chain sprockets. The part that sucks is that I have no way of locking the crank since the transmission and flywheel are off. It also calls for a special tool to hold the cams. This is honestly turning out to be a PITA, but I know it'll be worth it in the end. I'm confident that I can do it, it's just going to take more time and effort than I originally thought. I guess the good thing is that I'm learning the 6cyl engine more and more. Despite being greasy and having a cracked oil pan, I'm finding a lot of good things on my motor. If you remember back, I found out that it had Dinan software. I also found out it had a brand new water pump and thermostat. And when I took the valve cover off, well lets just say that I was very happy with how good the cams and valvetrain looked. Here's a couple pics of the inside, doesn't she look pretty: 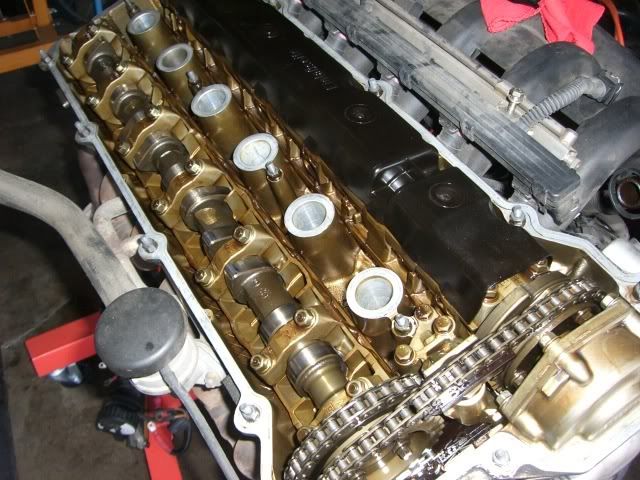 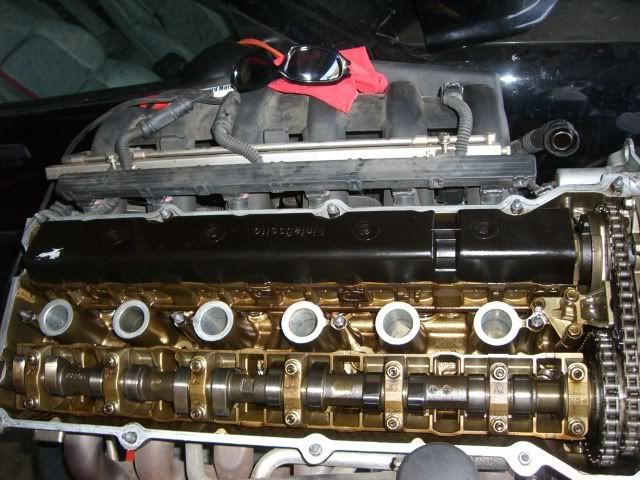 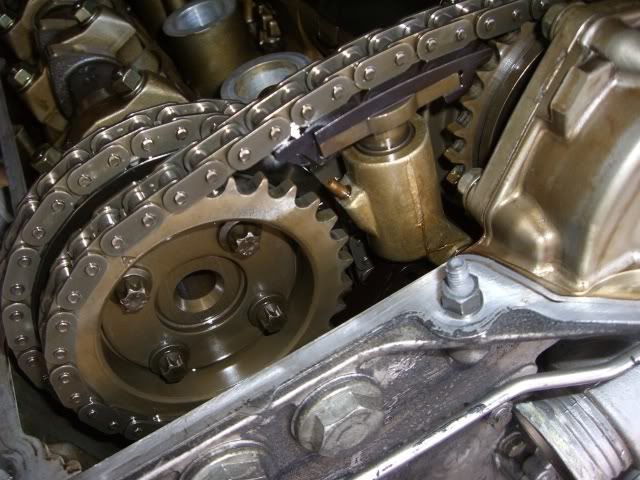 __________________ 4 MORE YEARS BABY!!! | | | | | 10-11-2008, 04:24 PM | #200 | | Senior Member Join Date: Sep 2006 Location: Wisconsin Posts: 1,895 |
Put your home made length of steel on the back of the engine. __________________ ...

ʎɐqǝ uo pɹɐoqʎǝʞ ɐ ʎnq ı ǝɯıʇ ʇsɐן ǝɥʇ sı sıɥʇ | | | | | 10-12-2008, 05:36 AM | #201 | | Moderator Join Date: Dec 2006 Location: SoCal318ti Posts: 1,574 |
It looks sexy Jess!!! I know that all your hard work will be worth it bro, as soon as you open it up when its all finished, it will more than likely be better than sex  | | | | | 10-13-2008, 03:03 AM | #202 | | Senior Member Join Date: Nov 2007 Location: Rocky Hill, CT Posts: 1,065 |
Jess, that same damn bolt screwed me over on my M50 when I was trying to pull the head. I coudn't find the sucker, but I knew something was still attached. Took me reading both manuals as well to figure out what it was.
Not sure what to tell you about the fact you can't keep it at TDC with no flywheel, but, you don't need the cam holding tool to time the cams. Just use a straight edge (I used a metal ruler) and when re-aligning the cams, the dots on the square ends should be facing up. The two sides with holes should be perfectly parallel, that's the same position the tool would hold it in. __________________
1995 318TI base. 95 2.5L from 325IS. S50 cams+pistons, e36 M3 front brakes. H&R race springs F+R. Turner Motorsport front sway bars, M3 control arms. M Roadster rear sway bar. Racing Dynamics strut brace. e36 325i 5spd. 3.25lsd from e28 535is. M Roadster short shifter. Conforti chip. | | | | | 10-13-2008, 05:18 AM | #203 | | NOBODY F's with the Jesus Join Date: Oct 2006 Location: Ventura California Posts: 7,824 | 
Quote: Originally Posted by budget76  Jess, that same damn bolt screwed me over on my M50 when I was trying to pull the head. I coudn't find the sucker, but I knew something was still attached. Took me reading both manuals as well to figure out what it was.
Not sure what to tell you about the fact you can't keep it at TDC with no flywheel, but, you don't need the cam holding tool to time the cams. Just use a straight edge (I used a metal ruler) and when re-aligning the cams, the dots on the square ends should be facing up. The two sides with holes should be perfectly parallel, that's the same position the tool would hold it in. | Budget, you're a wealth of knowledge and your advice is much appreciated. I currently have the engine hanging on the hoist and I'm making a tool to bolt onto the rear of the crank and into the back of the block to immobilize it. Good info on the straight edge, that's one less tool I don't have to fab. I'm so glad that I didn't try to pry the lower timing cover off. Bentley Publications will be receiving a letter from me shortly. Thanks a ton! __________________ 4 MORE YEARS BABY!!! | | | | | 10-13-2008, 05:32 AM | #204 | | Senior Member Join Date: Nov 2007 Location: Rocky Hill, CT Posts: 1,065 |
Quote: Originally Posted by cooljess76 Budget, you're a wealth of knowledge and your advice is much appreciated. I currently have the engine hanging on the hoist and I'm making a tool to bolt onto the rear of the crank and into the back of the block to immobilize it. Good info on the straight edge, that's one less tool I don't have to fab. I'm so glad that I didn't try to pry the lower timing cover off. Bentley Publications will be receiving a letter from me shortly. Thanks a ton! | No problem, that tiny little 1/8" thick bolt caused me to utter a choice few of curse words at that point  WTF, all the head bolts are out, why won't the ******* thing come off  Good idea fabbing up a lock. I read the straight edge from somewhere else, so I can't take credit, but I can pass it on and save others money  Oh, I would suggest picking up the vanos turning wrench. The first time I installed my vanos I didn't use it (brain fart, didn't remember I bought it), and turned the chain with a screwdriver, it was not a good method. The wrench lets you do it right once, I have to pull my vanos out for a 3rd time now. Thought the original was bad, but now this one is and not the original  Good luck. Any more questions with the head area, post up. I just went through it, and I believe the S52 and M50 are virtually identical in that aspect. When removing the vanos, take LOTS of pics, I didn't take enough and confused myself with what I had. It's not bad, just didn't have good pictures. Use LIBERAL amounts of old oil or the like on all the vanos pieces when re-installing, all must be free to move smoothly. Remember you're going to change the oil after <100 miles anyway, so that little bit of old stuff won't hurt aynthing  __________________
1995 318TI base. 95 2.5L from 325IS. S50 cams+pistons, e36 M3 front brakes. H&R race springs F+R. Turner Motorsport front sway bars, M3 control arms. M Roadster rear sway bar. Racing Dynamics strut brace. e36 325i 5spd. 3.25lsd from e28 535is. M Roadster short shifter. Conforti chip. | | | | | 10-13-2008, 12:53 PM | #205 | | Senior Member Join Date: Aug 2007 Location: Monterey, CA Posts: 770 |
QUOTE=budget76;197553]Jess, that same damn bolt screwed me over on my M50 when I was trying to pull the head. I coudn't find the sucker, but I knew something was still attached. Took me reading both manuals as well to figure out what it was. Not sure what to tell you about the fact you can't keep it at TDC with no flywheel, but, you don't need the cam holding tool to time the cams. Just use a straight edge (I used a metal ruler) and when re-aligning the cams, the dots on the square ends should be facing up. The two sides with holes should be perfectly parallel, that's the same position the tool would hold it in.[/QUOTE] Here's a better look of the bolts that you need to remove:  If I remember correctly you only need to remove the secondary timing chain to access these. If I were you I would replace all of these parts (or learn the hard way like I did)    I bought all the special tools to do this job but I was unable to use the pin and flywheel to lock the engine a TDC (lightweight flywheel), instead I used the crank pulley and timing cover markings to keep everythng in place. Locking the cams in place will keep the engine from turing once at TDC. The VANOS reinstall can be a bit tricky and I would recommend the special tool to do so, but here is a article that should help quite a bit. http://www.pelicanparts.com/bmw/tech...aft-Timing.htm BTW I'm sure you're having so many problems is just karma for being such an A$$ to everyone on the the board. Good Luck  | | | | | 10-24-2008, 09:34 PM | #206 | | Junior Member Join Date: Sep 2007 Location: Saybrook, CT Posts: 23 |
| | | | | 11-13-2008, 09:52 PM | #207 | | NOBODY F's with the Jesus Join Date: Oct 2006 Location: Ventura California Posts: 7,824 |
Well I did some degreasing today. I was going to paint the timing cover silver and the block with a high temp crinkle black, but it came out so clean I think I'll just leave it alone. Still need to replace the seals and gaskets, just wanted to clean her up a little so I don't get too dirty when the sh!t goes down. Here's a few pics: __________________ 4 MORE YEARS BABY!!! | | | | | 11-13-2008, 09:59 PM | #208 | | Senior Member Join Date: May 2006 Location: 43609 Posts: 3,425 |
Lookin pretty clean there jess, gonna feel great once you get it in the car. __________________ 1995 Hellrot Clubsport 318ti -Gone 1996 Schwartz II Sport 357ti - 5.7L V8 LS1/6 1997 Moregrun Metallic 318ti - Gone
1998 Schwartz II sport 318ti - M50TUB25/5 | | | | | 11-20-2008, 07:18 AM | #209 | | Member Join Date: Nov 2008 Location: Ventura County, CA/ Seattle WA Posts: 47 |
Good to see the progress | | | | | 11-20-2008, 12:03 PM | #210 | | NOBODY F's with the Jesus Join Date: Oct 2006 Location: Ventura California Posts: 7,824 |
Hey Stephen, hows it going man. Yeah I've been working on it lately. I finally finished making my cam locking tool today. I can't seem to find a timing chain tensioning tool for the S52. All the ones I've seen are for the m50 or m52. I'm wondering if the m52 tool will work, can't see why it wouldn't. Anyway, been pretty busy lately, you should stop by and take a look. __________________ 4 MORE YEARS BABY!!! | | | | | |
| Currently Active Users Viewing This Thread: 1 (0 members and 1 guests) | | |
 Posting Rules Posting Rules | You may not post new threads You may not post replies You may not post attachments You may not edit your posts
HTML code is Off
| | |
|


 Linear Mode
