 » Site Navigation » Site Navigation | | | | » Recent Threads | | | |  |  |  | |  09-09-2007, 02:55 AM 09-09-2007, 02:55 AM | | | Senior Member Join Date: Nov 2004 Location: Minneapolis Posts: 1,587 |  Cooling System Rebuild. PICS! Cooling System Rebuild. PICS!
Cooling System Overhaul 1996 318ti Auto / M44. Parts List Radiator, 17111728905 - $128 (ebay - AC Imports) OE Water Pump, 11510393338? - $79.82 (Tischer BMW) 1 Gallon... |  |  | By Tyler on 04-26-2010, 04:36 PM |
I have a question regarding the radiator.... If i missed this in here my bad.
When removing the radiator you lose ATF (automatic transmission fluid) maybe a pint or so, how do you replace the ATF which you lose? There is no dipstick for this to refill since it's technically lifetime fluid.
That's my ? since i have a new radiator to put in this weekend. | | | | |
Quote: Originally Posted by Tyler  I have a question regarding the radiator.... If i missed this in here my bad.
When removing the radiator you lose ATF (automatic transmission fluid) maybe a pint or so, how do you replace the ATF which you lose? There is no dipstick for this to refill since it's technically lifetime fluid.
That's my ? since i have a new radiator to put in this weekend. | Unless the design changed over the years, you shouldn't have to open the ATF system at all. The little ATF radiator unscrews from the man radiator then rescrews to the new one. If you did need to open it, here's how to properly fill it: http://www.ge39.com/files/SD92-114.pdf You basically make sure the fluid is at 30C - 50C with the engine running and the trans in park. Remove the fill plug and fill until it overflows. No dipstick, unfortunately (stupidly). | | Last edited by CirrusSR22; 04-26-2010 at 09:30 PM.. | | |
Quote: Originally Posted by Mr.Squeelerz I've been having fun with this project, but I hit a snag with the block coolant connector. The new one appears to be defective. It will not seat to the block. There is a 1/4 inch gap almost all the way around, so it CLEARLY will not seal. Not even going to attempt modifying anything to make it work. I prefer this part to be genuine BMW. The URO brand looks to have a poor mold design.
My old head connector was rotted beyond belief. Pretty much crumbled in my hands. | You must have gotten one like mine? http://318ti.org/forum/showpost.php?...3&postcount=49 | | | | |
Yep....fit exactly that bad.. Quote: Originally Posted by CirrusSR22 | | | | By Tyler on 04-27-2010, 06:50 PM |
Quote: Originally Posted by CirrusSR22 Unless the design changed over the years, you shouldn't have to open the ATF system at all. The little ATF radiator unscrews from the man radiator then rescrews to the new one. If you did need to open it, here's how to properly fill it: http://www.ge39.com/files/SD92-114.pdf You basically make sure the fluid is at 30C - 50C with the engine running and the trans in park. Remove the fill plug and fill until it overflows. No dipstick, unfortunately (stupidly). | Thanks for the info, i'll find out Sat weather permitting.. New England is the new Seattle,WA.. We get all the rain and they prob get all the sun now..lol | | | | |
Quote: Originally Posted by Tyler New England is the new Seattle,WA.. We get all the rain and they prob get all the sun now..lol | it's snowing in VT right now  | | | | | Coolant Block Connector
I strongly suggest getting a BMW manufactured Coolant block connector....unless you like major catastrophe's waiting to happen at any time. The aftermarket piece I received from Autohausaz.com was total garbage (would not seat properly), so I ordered a BMW one and finally got around to putting it on. The BMW piece fits like it was engineered to! Talk about piece of mind! The aftermarket one will probably work better as a drum-weed pipe if you like to smoke..though I don't, so it's taking up space in a landfill somewhere.
(the image I stole from the first page is for reference only)  | | Last edited by Mr.Squeelerz; 05-31-2010 at 05:41 AM.. | By bbbmw on 07-11-2010, 01:10 AM |
Did I understand Cirrus correctly - that when you put in the new tubes (OEM BMW), put a layer of silicone sealer around the plastic neck where it meets the block, to guarantee a tight (non-leaking) seal?
Just for grins, does anyone have an opinion on why BMW would produce a plastic coolant tube, instead of a metal one? I would just feel better knowing... | | | | |
Quote: Originally Posted by Mr.Squeelerz I strongly suggest getting a BMW manufactured Coolant block connector....unless you like major catastrophe's waiting to happen at any time. The aftermarket piece I received from Autohausaz.com was total garbage (would not seat properly), so I ordered a BMW one and finally got around to putting it on. The BMW piece fits like it was engineered to! Talk about piece of mind! The aftermarket one will probably work better as a drum-weed pipe if you like to smoke..though I don't, so it's taking up space in a landfill somewhere.
(the image I stole from the first page is for reference only) | +1 on this advice as I had a non OEM part fail on me within a year. Aug of '09 is when I refreshed my entire cooling system. Within the last couple months I noticed coolant puddling on my garage floor only after the car would sit over night. After looking over everything I noticed coolant was pooling on the block under the the block connector. I did notice the gap between the block and connector but assumed the o-ring had failed prematurely. So if yours does not does sit flush it will fail within a matter of time. This time I replaced with a OEM BMW part and it does sit flush with the block, so unless you want to go through the headache of removing the intake manifold again make sure to get the OEM block connector and save yourself the trouble. | | | | |
Thank you guys for this information. I received a URO brand connector from Pelican Parts and it had the same issue. Fortunately, due to these posts, I was aware of the issue and checked the part before I installed it. You guys saved me at least two days worth of time and I REALLY appreciate it. | | | | |
I was a little intimidated at tackling this project, but the write up settled my fears. I decided to make a catch can to help eliminate that crud all in the intake and injectors. Just waiting on the valve cover gasket and I should have it all back together. The catch can will be mounted between the motor and radiator fan. Its perfect spot since the cold air will help condense the oil and keep it in the can. Plus its about the ony open space in there! The PCV on this car is BASICALLY the same as any other right? Everything went back together very well, and I labled every SECTION of the harnesses, so now I am stuck with ONE LOUSY CONNECTOR that I cant find a home for. Can you guys please help me out? Heres a picture of the connector in question: 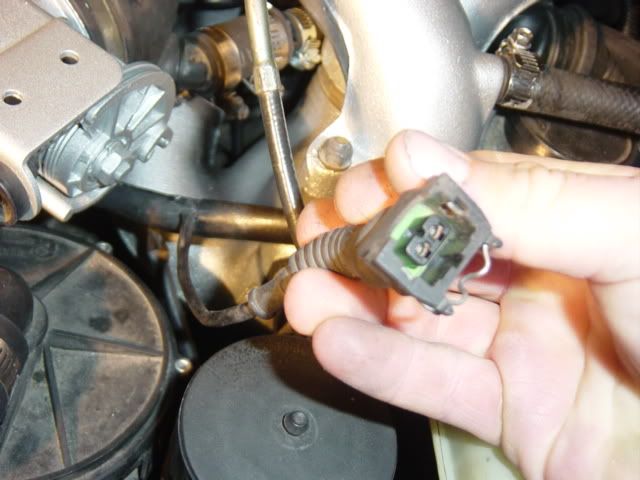 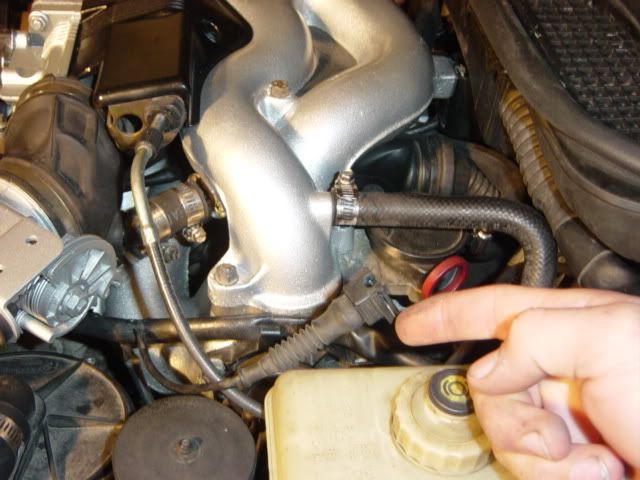 Heres the catch can:  | | Last edited by signature sound; 11-11-2010 at 05:42 AM.. | | | Nice write up!
Hi all-
The head coolant connector broke on my 96. Its really great that this was well documented. Does the lower intake manifold need to come off to replace this?
I do not think I have the skills to do this.... Is this a job that any shop can do or would it be best to take it to a BMW specialist?
Also I am in NYC- Any reputable shops in manhattan ( other than the dealers)
Thanks--
Joe | | | | |
Quote: Originally Posted by signature sound I was a little intimidated at tackling this project, but the write up settled my fears. I decided to make a catch can to help eliminate that crud all in the intake and injectors. Just waiting on the valve cover gasket and I should have it all back together. The catch can will be mounted between the motor and radiator fan. Its perfect spot since the cold air will help condense the oil and keep it in the can. Plus its about the ony open space in there! The PCV on this car is BASICALLY the same as any other right? Everything went back together very well, and I labled every SECTION of the harnesses, so now I am stuck with ONE LOUSY CONNECTOR that I cant find a home for. Can you guys please help me out? Heres a picture of the connector in question: [/IMG] | Is your DISA controller connected? Quote: Originally Posted by jm318ti Hi all-
The head coolant connector broke on my 96. Its really great that this was well documented. Does the lower intake manifold need to come off to replace this?
I do not think I have the skills to do this.... Is this a job that any shop can do or would it be best to take it to a BMW specialist?
Also I am in NYC- Any reputable shops in manhattan ( other than the dealers)
Thanks--
Joe | You will want to take both upper and lower intake off. It's an easy job. Just a little involved in some spots but nothing that should intimidate the average Joe. | | | | |
Quote: Originally Posted by Mr.Squeelerz Is your DISA controller connected? | Yep. Its connected. So is the fuel air vent valve. The vent valve was never disconnected, so I know that one is right. This one doesnt quite reach the DISA anyway. I was hoping by referencing where this connector pig tails, it would be easy to reference where it goes to. It splits off right where the loom attaches to the DISA. I have the loom back in its original spot because its snapped in where its indents are. Are there any other possibilities you may suggest? I can take more photos if needed?? | | | | |
I think that is the oil sending unit connector. Look at the back of the oul can near the base | | | | |
| Currently Active Users Viewing This Tutorial: 1 (0 members and 1 guests) | | |
 Posting Rules Posting Rules | You may not post new threads You may not post replies You may not post attachments You may not edit your posts
HTML code is On
| | |
|


 Linear Mode
