 » Site Navigation » Site Navigation | | | | » Recent Threads | | | |  |  |  |  09-08-2005, 07:14 AM 09-08-2005, 07:14 AM | #1 | | Senior Member Join Date: Dec 2004 Location: Northern New Jersey Posts: 395 |  Headliner DIY: In Progress Headliner DIY: In Progress
Quote: Doing the Headliner myself.
--------------------------------------------------------------------------------
I finally got fed up with the sagging headliner yesterday, so I decided to do some surgery. I got in the car, ripped the headliner off the sunroof, since it was halfway off already... only to find there's nasty plastic foamy sticky stuff underneath it. So I took off the sun visors, popped off the overhead lights, disconnected all the wiring, switches, etc. and also popped off the other panels on the sides of the car and in the back corners.
I peeled back the headliner, and had to pry it off of the sunroof fitting. It easily came right out the hatch. I then pulled off the fabric and used a putty knife to scrape away some of the glue. I still have to go over the headliner with some sort of solvent to thoroughlly clean it, but it's almost set for some new cloth.
I found a kit online for like 50 bucks I'm going to get, I'm at work now so I don't have the link. I also took pictures of the job, and the mess.
One question that I have:
I see on the ceiling, there's a big plastic plate that's covering all of the sunroof's complexity. I want to be able to get the upholstered part off so that I can glue the cloth onto it. If i take off this plastic plate, is that going to disrupt anything? I noticed that it's connected to the sunroof drainage system, but that's not really a problem.
All in all, taking apart the headliner in one piece was not difficult. It took me all of an hour to take all the pieces off and remove the headliner with no instructions or anything. As long as the fabric goes on smoothly, it'll be an easy DIY fix.
Pictures to come. Maybe I'll start a new DIY thread for that.
Jeff | Well that was the post in the other thread, and I just posted a handful of pictures in a new album. Check it. http://www.318ti.org/gallery/showgallery.php?cat=519 |  |  | | 09-08-2005, 07:18 AM | #2 | | Senior Member Join Date: Dec 2004 Location: Northern New Jersey Posts: 395 |
This is the kit i was considering buying, but I am not sure that the color would match... Though it is Black.
I believe I need 1/8 for the sunroof portion, and 1/4 for the rest. Any other suggestions?
Thanks.
Woot, 100th post! | | | | | 10-09-2005, 11:26 PM | #3 | | Senior Member Join Date: Dec 2004 Location: Northern New Jersey Posts: 395 |
This is the kit I bought: http://www.eastwoodco.com/shopping/p...word=headliner Took them about a week to ship it, maybe 9 days. It's a nice black color. Today I went over to the hardware store and bought some alcohol to kill some of the scummy glue leftover from the old headliner. I went over it a few times with a brush, and a rag, then let it all dry. I recommend you get someone to help you, the helping hands make it much easier. Spray the glue on the headliner and on the foam side of the fabric. Let it dry. It is Contact Cement. Most mistakes are made by people who are impatient and do not let the glue set correctly. I had my father help me with the rest. One of us held the fabric up, and the other started sticking it to the contours of the headliner. Once it sticks, you have about 5 seconds to unstick it if you must. Leave plenty of room for the curves and ridges. Rub it firmly up, down, and around from the center out to the edges. Then with a very sharp razor blade, cut off some of the excess. Don't forget to save some fabric for the sunroof switch panel. The sunroof must be done separately due to the fact that you need more material for it than the amount you cut out of the middle of the headliner. Pictures and finishing touches to come, I haven't mounted it in the car yet. It just started raining.  | | | | | 10-11-2005, 08:19 PM | #4 | | Senior Member Join Date: Aug 2003 Location: cary, nc Posts: 2,259 |
im very interested....my headliner is jacked up....klet me know how it finsihes! __________________ 1995 318ti Active
Pioneer Speakers [] Aluminum Billet door locks [] ACS Pedals/Deadrest [] ACS Shift Knob / E-Brake Handle [] Clear Corners/Tails/Sides [] Sylvania Exterior Lighting [] Custom CAI [] Dinan Engine Chip [] Dinan Transmission Chip [] H&R Race Springs [] Tokico Illumina Shocks [] BMW X-Brace [] Relocated Lighter Mod [] Custom iPod Mod http://www.cardomain.com/id/robcarync | | | | | 11-17-2005, 06:00 PM | #5 | | Senior Member Join Date: Jun 2003 Location: PA Posts: 822 |
Where are the pictures at JPerfect? I am very interested in checking out the DIY headliner kit you installed. My headliner just got its first bubble. | | | | | 02-15-2006, 09:57 PM | #6 | | Senior Member Join Date: Jun 2003 Location: PA Posts: 822 |
Any progress on this fix JPerfect. | | | | | 04-03-2006, 08:44 PM | #7 | | Junior Member Join Date: Mar 2006 Location: Cary Posts: 7 |
Do you have any pics of the final product? thanx | | | | | 04-03-2006, 10:32 PM | #8 | | TRETEN IRGENDEINES ESELS Join Date: Aug 2004 Location: Rhode Island Posts: 3,687 |
About a year ago or so Schussey replaced his headliner if i can recall,not sure if he ever posted pictures on this. __________________ 98 Avus Blue 318 ti Active
clear outs all around,stealth turning signals,blue led interior lights, 35% tinted windows,K&N air filter, 12" Kenwood Sub, MTX Thunder Amp,Alpine cd changer, Leatherz Armrest,ACS Pedals/Handbrake/FloorMats & Vitesse Tuning Carbon Fiber B-Pillars/CF Spark Plug Cover, New 16" MSW Typer 14 Rims on Goodyear Triple Treds 

www.myspace.com/avusblueti | | | | | 09-05-2008, 10:09 AM | #9 | | Senior Member Join Date: Sep 2008 Location: San Diego Posts: 180 |
i have a saggy liner, but no sunroof, I am going to be doing this in the next week or so, ill take pics of the whole thing. | | | | | 09-05-2008, 08:53 PM | #10 | | Senior Member Join Date: Dec 2004 Location: Long Beach area Posts: 1,189 |
Thread from the dead, but yeah, my headliner's pretty messed up with now and I need to do it too hahah...
I've heard people going to WalMart and buying their fabric there...
-Randy __________________ 97 Jet Black 318ti Sport. Not so stock anymore!.... 
Now Featuring:318ti.org sticker  Now featuring: Hartge exhaust|Blacked out Grilles|Front Clear Corners or Ambers depending on how I feel|325is vented front brakes|Bilstein Sports|H&R Sports|E46 RSMs w/ Z3 reinforcment plates|16" Style 45s|17" E46 M68 rims|18" Authentic Hartge Classics C|OEM M135 ZHP wheels Now featuring: Hartge exhaust|Blacked out Grilles|Front Clear Corners or Ambers depending on how I feel|325is vented front brakes|Bilstein Sports|H&R Sports|E46 RSMs w/ Z3 reinforcment plates|16" Style 45s|17" E46 M68 rims|18" Authentic Hartge Classics C|OEM M135 ZHP wheels
and
99 Titan Silver 323is Dinan S1+few more mods
Coming sometime in the future:...SCed 2.1...new (to me) car mod maybe?...all in one car | | | | | 09-19-2008, 12:13 AM | #12 | | Senior Member Join Date: Sep 2008 Location: San Diego Posts: 180 |
I followed the write up on the bimmer forums but I had to do much less work cause I have no sunroof, and since its a 95 and a basic interior I have cheapo handles, lights and belts. I didnt have to take off 1 seatbelt The back panels are easy 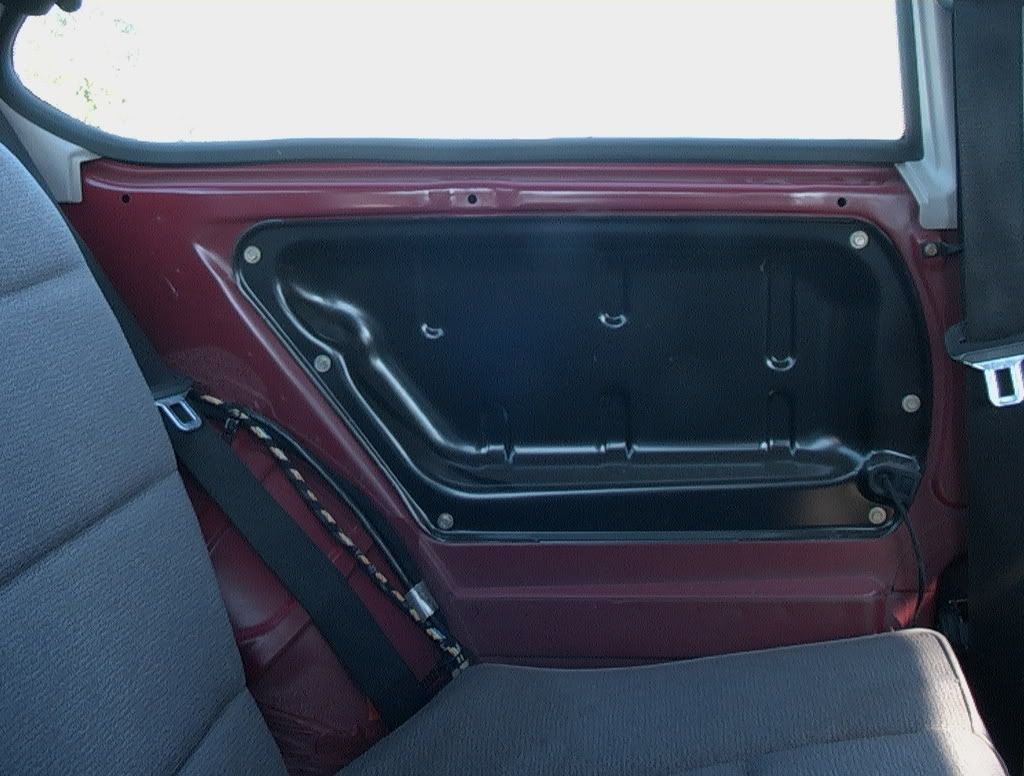 Even all the stuff up front, the visors etc was cake. I went out last night after I took the liner out, I even popped the visors back to block the maplight from sagging in my face. 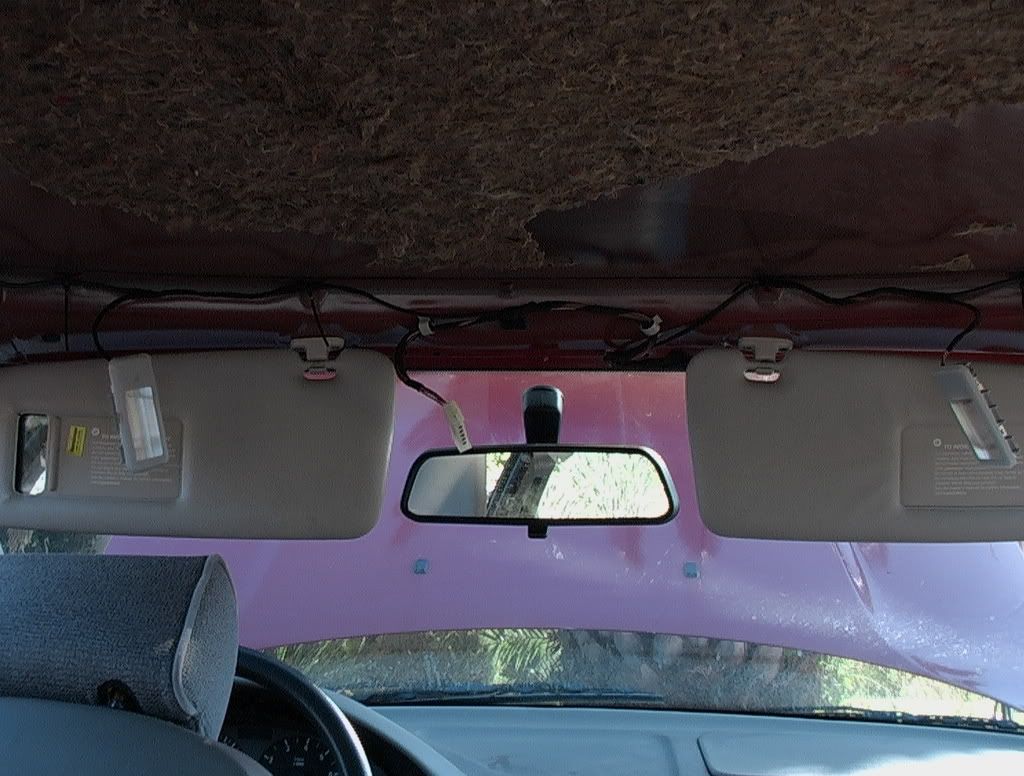 Notice I didnt need to take the belt assembly off as it says you have to do in the bimmerforum writeup. It looks like he was doing it in a sedan in that writeup. 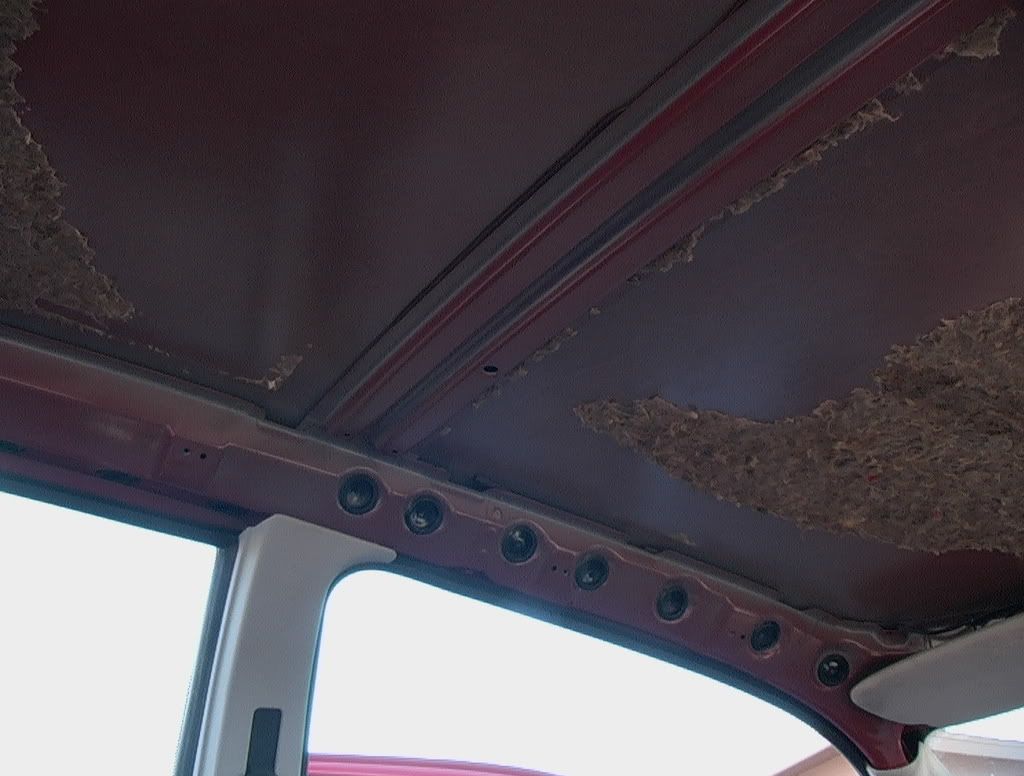 The toughest part by far was getting the sucker out of the car. Its very delicate, so you have to be careful, a gentle wind nearly bent mine in half. Im currently in the process of getting that nasty foam off of it so I can spray it or re-fabric it. 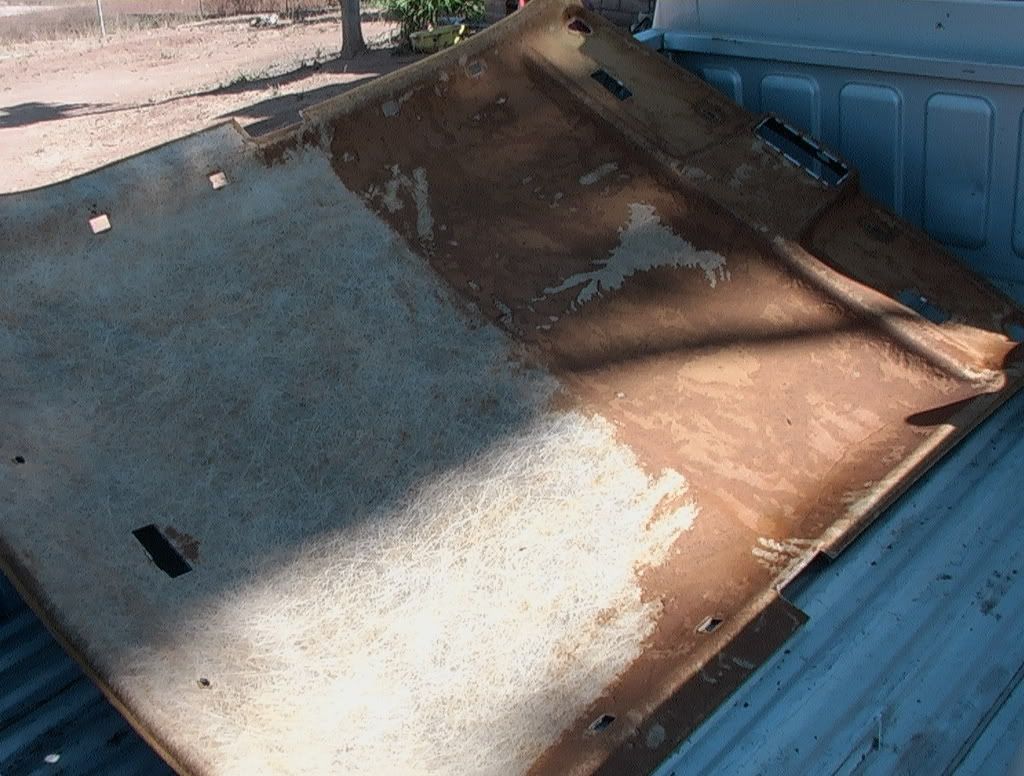 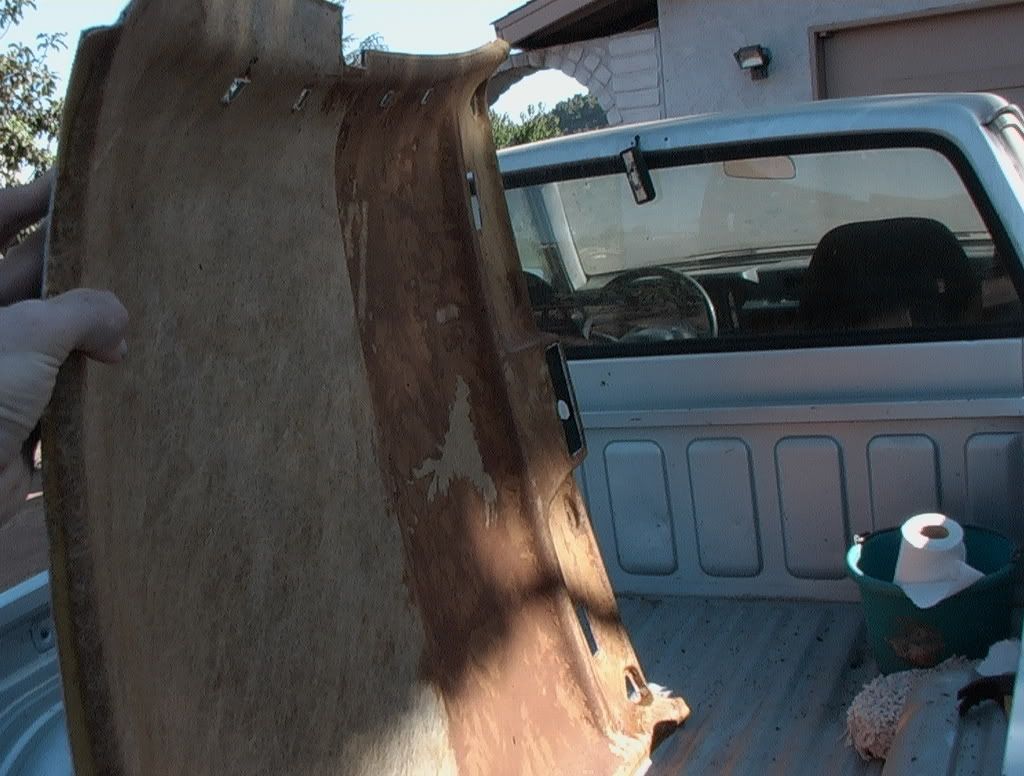 | | | | | 09-22-2008, 11:38 PM | #13 | | Senior Member Join Date: Sep 2008 Location: San Diego Posts: 180 |
didnt get pics of what it looked like after I sprayed it before it went in I used a trunk liner splatter paint way better than saggy cloth   | | | | |
| Currently Active Users Viewing This Thread: 1 (0 members and 1 guests) | | |
 Posting Rules Posting Rules | You may not post new threads You may not post replies You may not post attachments You may not edit your posts
HTML code is Off
| | |
|


 Linear Mode
