 » Site Navigation » Site Navigation | | | | » Recent Threads | looove 04-16-2024 01:18 PM 04-16-2024 01:18 PM 0 Replies, 1,308 Views | | | lolita porn 04-13-2024 11:45 PM 04-13-2024 11:45 PM 0 Replies, 603 Views | lolita porn 04-13-2024 11:43 PM 04-13-2024 11:44 PM 1 Replies, 493 Views | lolita porn 04-13-2024 11:40 PM 04-13-2024 11:41 PM 1 Replies, 516 Views | lolita porn 04-13-2024 11:38 PM 04-13-2024 11:39 PM 1 Replies, 506 Views | lolita porn 04-13-2024 11:36 PM 04-13-2024 11:37 PM 1 Replies, 525 Views | lolita porn 04-13-2024 11:35 PM 04-13-2024 11:35 PM 0 Replies, 504 Views | lolita porn 04-13-2024 11:34 PM 04-13-2024 11:34 PM 0 Replies, 496 Views | lolita porn 04-13-2024 11:33 PM 04-13-2024 11:33 PM 0 Replies, 485 Views | |  |  |  |  10-24-2011, 05:51 PM 10-24-2011, 05:51 PM | #1 | | Senior Member Join Date: Jul 2011 Location: SoFla Posts: 482 |  Clean rear seat delete Clean rear seat delete
im sure people have done this before and i did search in the forums for an existing thread on this and couldnt find anything. I've decided not to put the rear seats back in after the swap, and am in the process of creating a false floor for the rear out of wood and marine carpet spanning from the rear seat pan all the way to the trunk. I am doing this in order to give it a clean, stockish look. The biggest problem i have is with the outside back seat bolsters themselves. Leaving these on will look ameturish and taking them off looks rough. Could anybody post some pictures of solutions so i can get an idea of what i should be trying.....or just a picture of a clean rear seat delete at all? thanks in advance guys |  |  | | 10-25-2011, 05:16 AM | #2 | | Senior Member Join Date: Nov 2010 Location: Potomac Falls VA DMV Posts: 1,794 |
I don't think I've seen a clean rear seat delete. I've seen plenty of ti's with no seat but never one with a custom piece. I really wanna see this. Keep us updated with pics and all!
Sent from my iPhone using Tapatalk __________________
Im guessing im the youngest member on here with a S52 power'ed Ti at 16 years old! | | | | | 10-25-2011, 05:21 AM | #3 | | Senior Member Join Date: Jul 2011 Location: SoFla Posts: 482 |
Quote: Originally Posted by slow_ti  I don't think I've seen a clean rear seat delete. I've seen plenty of ti's with no seat but never one with a custom piece. I really wanna see this. Keep us updated with pics and all!
Sent from my iPhone using Tapatalk | no problem, im waiting on the carpet though, which will probably take a week or so to ship, once i have all the materials it shouldnt take me more than a day to get the floor looking nice, but like i said, its the outside bolsters that are going to take some creativity | | | | | 10-25-2011, 01:22 PM | #4 | | Senior Member Join Date: Apr 2007 Location: Elizabeth City, NC Posts: 3,877 |
This is the best one I have ever seen, made by Iding Power. 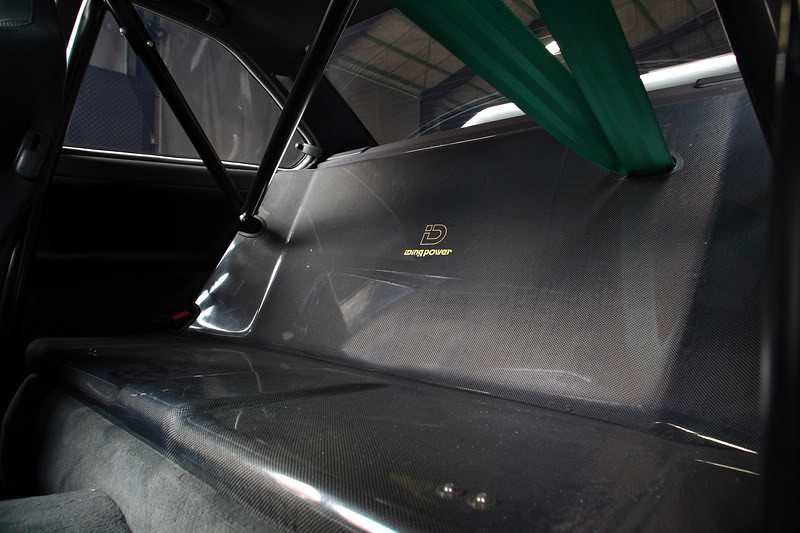 __________________ ~Dave~
98 328ti Morea Grun slicktop
11 128i space gray slicktop
13 JGC WK2 Deep Cherry
Search | RealOEM | | | | | 10-25-2011, 04:47 PM | #5 | | Member Join Date: Aug 2011 Location: Long Beach CA Posts: 88 |
I use a template tool and make the floor in 2 pieces (lengthwise). Once you get a good fit you can push each piece tight against the side and then mark them for the center cut.
On the last one I did I used split black hose to trim the edges where the floor meets the side panels.
Best would be if you can figure out a ledger for the floor to rest on and be screwed to but that may be difficult because of the soft panels... | | | | | 10-26-2011, 06:05 AM | #6 | | Senior Member Join Date: Jul 2011 Location: SoFla Posts: 482 |
Quote: Originally Posted by spidertri This is the best one I have ever seen, made by Iding Power. | damn...thats really nice but not sure how i could pull it off in the ti...i was thinking of just making a clean floor considering the parcel shelf is optional....upon closer inspection, it is clearly a ti...sorry
Last edited by Crashaddict; 10-26-2011 at 02:23 PM. Reason: im an idiot | | | | | 10-26-2011, 02:30 PM | #7 | | Senior Member Join Date: Jul 2011 Location: SoFla Posts: 482 |
Quote: Originally Posted by urbanmisfit I use a template tool and make the floor in 2 pieces (lengthwise). Once you get a good fit you can push each piece tight against the side and then mark them for the center cut.
On the last one I did I used split black hose to trim the edges where the floor meets the side panels.
Best would be if you can figure out a ledger for the floor to rest on and be screwed to but that may be difficult because of the soft panels... | thats one of the issues im trying to work out. i figure if i make it one solid piece, the wheel wells will hold it in place. ill be removing that fat sensor from the seatpan, and am considering using the screws from that to make it sit flush against the pan. for the sides im considering just making a solid skirt covered in carpet, that i can secure in place of the bolsters, ind like to use foam, but foam+glue does not exactly work too well | | | | | 10-26-2011, 03:32 PM | #8 | | Member Join Date: Aug 2011 Location: Long Beach CA Posts: 88 |
Quote: Originally Posted by Crashaddict thats one of the issues im trying to work out. i figure if i make it one solid piece, the wheel wells will hold it in place. ill be removing that fat sensor from the seatpan, and am considering using the screws from that to make it sit flush against the pan. for the sides im considering just making a solid skirt covered in carpet, that i can secure in place of the bolsters, ind like to use foam, but foam+glue does not exactly work too well | I used supports riveted to the floor and square tubing behind the seats to support it and hold it in place and then machine screws and rivnuts to fasten it. Also, it was over 4' wide behind the wheel wells and 5' long so it had to be 2 pieces. This one is in a Mazda 323 work beater | | | | | 10-26-2011, 06:57 PM | #9 | | Senior Member Join Date: Jul 2011 Location: SoFla Posts: 482 |
Quote: Originally Posted by urbanmisfit I used supports riveted to the floor and square tubing behind the seats to support it and hold it in place and then machine screws and rivnuts to fasten it.
Also, it was over 4' wide behind the wheel wells and 5' long so it had to be 2 pieces.
This one is in a Mazda 323 work beater | Very nice, how did you arrange the supports? | | | | | 10-27-2011, 12:35 AM | #10 | | Member Join Date: Aug 2011 Location: Long Beach CA Posts: 88 |
I used a building laser to set the heights but a level works too; just find the spot that's the highest or where you want the floor to be and start there. The supports are just 3/16 flat bar bent into a "C" with "feet" which are drilled and rivetted to the floor pan They were roughly laid out and riveted down; the ply positioned and laid on top of them and holes drilled through both; got a few extra holes in the ply  10-24 rivnut into the FB, countersink the flat head screws and done At first I tried to do a one piece but I couldn't get all the edges to fit tight; the template tool has to stay at right angles to the centerline of the car.....sorta I overlapped the ply a bit in the middle; snapped a chalk line down the center and drilled a 1/8th hole on the line at each end so the bottom piece was marked as well. I used a butchered pick-up canopy latch minus the handle for the spare tire lid... I think I ended up with a drum effect too; car seemed louder | | | | |
| Currently Active Users Viewing This Thread: 1 (0 members and 1 guests) | | |
 Posting Rules Posting Rules | You may not post new threads You may not post replies You may not post attachments You may not edit your posts
HTML code is Off
| | |
|


 Linear Mode
