 » Site Navigation » Site Navigation | | | | » Recent Threads | looove 04-16-2024 01:18 PM 04-16-2024 01:18 PM 0 Replies, 408 Views | | | lolita porn 04-13-2024 11:45 PM 04-13-2024 11:45 PM 0 Replies, 213 Views | lolita porn 04-13-2024 11:43 PM 04-13-2024 11:44 PM 1 Replies, 139 Views | lolita porn 04-13-2024 11:40 PM 04-13-2024 11:41 PM 1 Replies, 138 Views | lolita porn 04-13-2024 11:38 PM 04-13-2024 11:39 PM 1 Replies, 143 Views | lolita porn 04-13-2024 11:36 PM 04-13-2024 11:37 PM 1 Replies, 137 Views | lolita porn 04-13-2024 11:35 PM 04-13-2024 11:35 PM 0 Replies, 120 Views | lolita porn 04-13-2024 11:34 PM 04-13-2024 11:34 PM 0 Replies, 126 Views | lolita porn 04-13-2024 11:33 PM 04-13-2024 11:33 PM 0 Replies, 118 Views | |  |  |  | |  08-30-2010, 08:45 PM 08-30-2010, 08:45 PM | #16 | | Senior Member Join Date: Jan 2005 Location: Jax, FL Posts: 541 |
Replace with something like this? http://www.secondskinaudio.com/therm...-wave.php#tab5 Thanks for the tip. Its hot enough down here as it is! I really don't want to add something like bed liner or something that is painted or sprayed on.
Last edited by Shellback; 08-30-2010 at 08:47 PM. |  |  | | 08-30-2010, 09:23 PM | #17 | | NOBODY F's with the Jesus Join Date: Oct 2006 Location: Ventura California Posts: 7,824 |
I'm sorry shellback, I misinterpreted your previous post and thought you were referring to the aluminum or tin heatshield that screws onto the transmission tunnel above the driveshaft and exhaust. Looking back, I realize that you were referring to the cloth-like insulation that drapes down from the firewallas seen in these photo's: 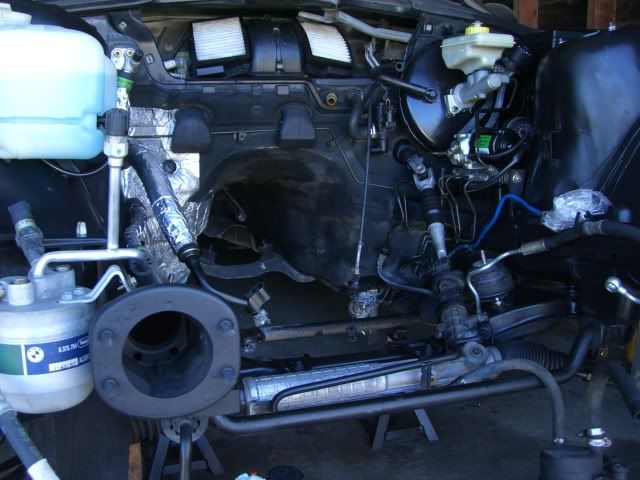 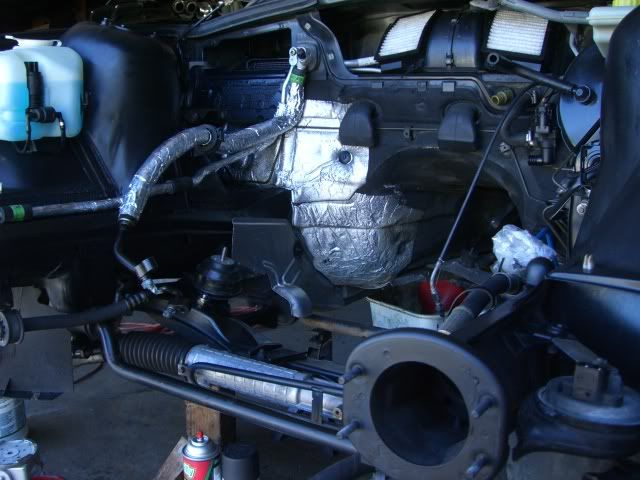 I don't think the cloth insulation is as critical for heat displacement as it is for sound deadening. I'm no expert on this, so my advice is mearly an opinion. I think as long as the waffle-stamped heatshield is in place, the floorboard shouldn't get too hot. Again, it may be a little noisier inside of the cabin without the cloth insulation in place. The product that you linked looks like a safe alternative. Hopefull someone else will chime in and correct me if I'm wrong. | | | | | 09-02-2010, 11:20 PM | #18 | | Senior Member Join Date: Feb 2007 Location: Avondale, Az Posts: 203 |
Good progress so far, keep up the good work. As for the insulation, I would try the product you posted. Seems to be thicker than the original material. | | | | | 01-24-2011, 11:56 PM | #19 | | Senior Member Join Date: Jan 2005 Location: Jax, FL Posts: 541 |
quick question...
Can I start the engine for a quick test start without the driveshaft installed? Only thing I will have is headers, so it should sound beautiful!
Reason is I just want a quick fix in order to motivate me to get off my ass and finish this swap! | | | | | 01-25-2011, 01:43 AM | #20 | | NOBODY F's with the Jesus Join Date: Oct 2006 Location: Ventura California Posts: 7,824 |
Quote: Originally Posted by Shellback  quick question...
Can I start the engine for a quick test start without the driveshaft installed? Only thing I will have is headers, so it should sound beautiful!
Reason is I just want a quick fix in order to motivate me to get off my ass and finish this swap! | Sure you can. As long as you have a flywheel and clutch installed and torqued to spec. I wouldn't rev it too hard or for too long without an exhaust hooked up though, it's bad for the exhaust valves. I've heard of people burning up their valves from not running enough back pressure. BTW, looking back at my previous post, I feel like i might have misguided you by saying that the insulation was un-needed. Yeah it helps sound deadening, but it's also right above the exhaust manifold. I hope the passenger legwell doesn't get too hot and melt any wires. Might want to take that into consideration(if you haven't already) before you actually start driving the car. Sorry man. | | | | | 01-26-2011, 04:38 AM | #21 | | Senior Member Join Date: Jan 2005 Location: Jax, FL Posts: 541 |
Thanks Jess,
I went ahead and ordered some material to cover the firewall and transmission tunnel. I’m also concerned about heat affecting any wires or other materials.
On a side note, did you use your factory A/C lines when you did your swap?
I’m using the compressor from the M3, but wasn’t sure if I also needed any other parts from the M3 A/C system.
____________________________
Edit*** Nevermind. Read a few other posts, seems like other projects included swaping the entire A/C system, including all the lines ***
Last edited by Shellback; 01-27-2011 at 05:05 PM. Reason: Edit | | | | | 02-19-2011, 01:50 AM | #22 | | Senior Member Join Date: Jan 2005 Location: Jax, FL Posts: 541 | 
Utter frustration...
Well, I wish it was going as good as other swaps. Right now I’m just frustrated and need to walk away from this project for a few days to calm down. I’m stuck with an S52 crooked in the engine bay. It will not budge. It is literally stuck and I can’t place it on its correct location. To make it worse, I need to pull it out again because I broke some items while trying to install it. Here’s what happened:
- I thought the S52 was going to be as easy as removing the M44. I was wrong!
- I got the engine bay nice and clean, wrapped the P/S bracket with some nice ¼ ID hose to protect it. I even applied some heat shield on the firewall since the original lagging type was all deteriorated.
- So far all is going well. I replaced the heater hoses on the heater valve located on the Driver’s side firewall. However, I noticed I should’ve installed the heater valve hose on the engine first and then once the engine would be installed, hook up the heater hose on the heater side last. Anyway, too late. See below...
- I scratched the hell out of my paint on the passenger side strut tower. I also scratched the hell out of the actual valve cover due to I didn’t remove the coil plug bracket. So I cut the bracket with a sawz all, but it looks like crap now.
- As I tried to continue installing engine, I bent the P/S bracket that I had meticulously wrapped with hose. Out comes the sawz all again... Finished product on this sawz all rush job is a razor sharp edge that would put my Wüsthof bread knife to shame.
- Of course, it gets better. I should’ve quit but instead I figured I do the sheet metal work later once the engine was in. I figure I can just mask it really good...As I tried to avoid the steering column, I didn’t notice I kept messing up the cowling lip – which sits right below the plastic cowlings below the wind shield.
- So I finally got the oil pan over the steering column aluminum part J!m warned us to be careful with. I was able to get the Driver’s side engine mount arm on the engine mount. The passenger side was not installed on the engine as recommended by other posts.
- Then I notice the two plastic tubes that hold the heater hoses and exposed, so somehow, all that moving around must’ve loosened the hoses off. Strange, because I remember I had nice new tight OEM hoses with the really good OEM radiator hose clamps. Well, you guessed it – I tore the firkin hoses off, along with the actual threaded part. Basically, I need a new connector, and somehow try to salvage the new hoses with plastic connector still inside...
- I decide my next move is to get the engine out. This has gone long enough and I’m rushing it so I need to start all over again patiently. I also want to grind the brackets I hacked off previously and finish them off properly with primer/paint; replace the heater valve connector I destroyed; and whatever else destruction I caused.
- But now the engine is stuck. It is crooked. I think the driver’s side is ok, but the passenger side is where I’m stuck. Again, I have no engine mount on that side installed yet. I also notice the area around the valve cover is wedged pretty bad on the passenger side firewall. I tried lifting the bell housing with a floor jack to try and wedge her free, but no luck.
- You are going to kill me when I tell you this next part, but I really overlooked this important part from J!m’s manual. I removed the S52 from the donor engine, along with the M44 from the ti with only an engine hoist. I did not use an engine leveler. I figure if the S52 came out of the M3 sedan with no issues, and the M44 came out the same, I didn’t need an engine leveler. Also, my connection points for the engine hoist are the front pad eye on the S52, but I’m wrapping the chain around the bell housing. There is a connection part between the bell housing and block, but I do not have any type of attachment/clasp to hook up to it. And, once the engine is in its place, how would I remove that connection? The chain around the bell housing method worked to remove the S52 and M44.
- Ok, so maybe the issue is that I need an engine leveler to INSTALL and engine...I tried several common auto part retailers and no luck. I found a Harbor Freight and figured I’d visit it since I’ve never been to one before. I was surprised with the quality of the junk I witnessed in there! I mean, the items on the website look nice, but this store was scary! A Big Lots store looks more like a Saks compared to this dump. Anyway, I pick up a $40 engine leveler and made sure my life insurance was up to date prior to using it.
- I try the leveler at the scene of the crime. After opening up the really cheesy box, I noticed the handle is missing. I figure its no big deal....
- I greased up all moving parts on the leveler with white lithium because once there was weight applied, the leveler is hard as hell to turn, not to mention tearing my hands up because it’s missing the turning knob. Late note here...my wife says I need stitches...anyway...
- Well, the engine still sits in its non-intended position. Several thoughts have raced through my mind, aside from torching the ****er! Maybe I should’ve lowered the front suspension and engine and remove it from the bottom. But I’m not sure how that would come out, especially now, with an engine sticking out the way it is now.
- Right now my objective is to get the S52 out and fix/replace the damage.
- Then, I’m seriously thinking on getting the TI on a flat bead and getting it up to San Antonio or Austin, which I hear have shops that are swap knowledgeable.
- A bit more background...the car is in a shop on a military base, so I can only work on it sporadically. Unfortunately I really get no support from the employees there. They are nice folks but they know nothing about a project like this. One kept telling me I was mistaken and the engine I was trying to install will never fit....
- Anyway, I know it’s a long story but I as you can tell this has been a bit therapeutic.
- Ummm, what else....Anyone near South Texas want to give me a hand?
- Forgot to mention....the front nose, a/c, cooling is all removed off the front.
Last edited by Shellback; 02-19-2011 at 01:58 AM. | | | | | 04-08-2011, 12:42 AM | #23 | | Senior Member Join Date: Jan 2005 Location: Jax, FL Posts: 541 |
Im ok now....  Took a break and now Im back to the grind.  So far the following has been done: -Covered tunnel in heat shield. -Touched up engine bay. -New M3 engine mounts. -Engine and tranny are in. -Replaced P/S hoses w/ M3 pump and hoses. -Intake and TB are in. -ECU is in just sitting in hole until I test fire. -key chips have been swapped; green EWS box behind glove box has been swapped. A/C lines are out. I will be replacing them with M3 parts later on. Still need help with:  -A few cables Im not sure where they go. Please look at the images and help me decipher what goes where. -All the cables you see in the images are from the donor M3/4/5. Maybe some dont apply to the E36/5???? -There are 3 cables on the passenger side. -Im 99% sure one goes to emissions air pump. The other 2 Im lost On the Drivers side, there is a device I believe is the ASC which will be eliminated from the project. I think it matches this http://www.realoem.com/bmw/showparts...00&hg=13&fg=15 | | | | | 04-08-2011, 12:46 AM | #24 | | Senior Member Join Date: Jan 2005 Location: Jax, FL Posts: 541 |
... | | | | | 04-08-2011, 01:04 AM | #25 | | Senior Member Join Date: Jan 2005 Location: Jax, FL Posts: 541 |
few more images | | | | | 04-08-2011, 02:18 AM | #26 | | Senior Member Join Date: Dec 2010 Location: Wichita Falls, Texas Posts: 1,364 |
You guys are fearless with your engine swaps and so forth, and I mean that as a compliment. Keep posting your progress; I really enjoy following your exploits. | | | | | 04-08-2011, 03:59 AM | #27 | | Senior Member Join Date: Jan 2005 Location: Jax, FL Posts: 541 |
I was nervous jumping into this project. As J!m stated in his manual, be sure you are capable before taking apart a perfectly running car.
As far as the ASC, I think I’m going to delete the system, including the ASC t-body. I’m still doing some research on the delete on exactly what is needed to delete the system on an OBD2 (new elbow, what to do about ABS light, etc.). | | | | | 04-09-2011, 02:23 AM | #29 | | Senior Member Join Date: Mar 2005 Location: Portland Or Posts: 2,666 |
EWS box synced?
Dave __________________
Dave - PDX
1995 318ti - Active Black and Tan.
2005 330xi - Mtech 1 - 6spd - Orient Blue/Black | | | | | 04-09-2011, 02:43 AM | #30 | | NOBODY F's with the Jesus Join Date: Oct 2006 Location: Ventura California Posts: 7,824 |
I don't think that red wire should be grounded. It looks to me like it should go to the positive distribution block. | | | | | |
| Currently Active Users Viewing This Thread: 1 (0 members and 1 guests) | | |
 Posting Rules Posting Rules | You may not post new threads You may not post replies You may not post attachments You may not edit your posts
HTML code is Off
| | |
|


 ) videos and help me find where these cables go to.


 Linear Mode
