 » Site Navigation » Site Navigation | | | | » Recent Threads | | | looove 04-16-2024 01:18 PM 04-16-2024 01:18 PM 0 Comments, 1,678 Views | |  |  |  | |  09-09-2007, 02:55 AM 09-09-2007, 02:55 AM | | | Senior Member Join Date: Nov 2004 Location: Minneapolis Posts: 1,587 |  Cooling System Rebuild. PICS! Cooling System Rebuild. PICS!
Cooling System Overhaul 1996 318ti Auto / M44. Parts List Radiator, 17111728905 - $128 (ebay - AC Imports) OE Water Pump, 11510393338? - $79.82 (Tischer BMW) 1 Gallon... |  |  | | |
yes rear pipe can be replaced best from underneath car
reach up and do it by feel | | | | |
but when you had your radiator out did you do this to your AC condenser ? Professional Grainger AC Condenser cleaner, Hyper Alkaline, sprays on as a liquid. Bubbles froths foams gurgles and gets HOT actually as it dissolves every single dead bug, hair, feather, bit of tar, animal crud, thats wedged inside the condenser. If you didnt clean the condenser as well as it can be done, or put a new one in, you didnt do a full cooling system service. you dont have to remove the bumper, the only reason mine was off is the car is getting painted too. 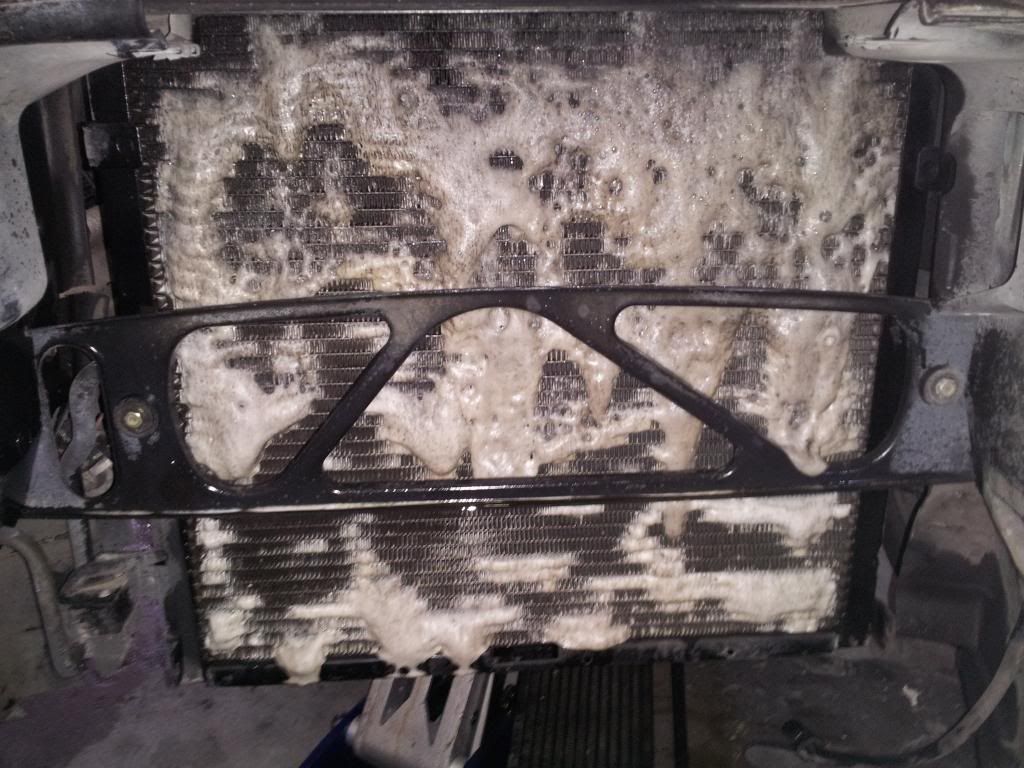 | | | | |
Last weekend I replaced the plastic Y pipe at the back of the head, by way of taking the cam cover off, and replacing those gaskets, plugs too. Engine ran so much smoother with the new plugs, I couldn't help but notice the crunching gravel sound coming from the water pump. This weekend, with new pump in hand - as with many it seems, having a real problem getting the old one out. Car has 185k, pump shaft was wobbly, several spat-out roller bearings sit in a bracket below. So no going back. The thing will not budge. The top of the pump broke out, etc. - a claw hammer doesn't budge it, I don't have access to build my own puller. I'm thinking of taking an angle grinder to it, just cut the f*cker until what's left comes out. Any thoughts/objections? | | | By wake74 on 08-18-2013, 10:46 PM |
Just did this on mine and thought I would never get it out. Probably the most frustrating car related project I have ever done. I tried spinning it with a cold chisel to break it loose a bit, pipe wrench on it etc.
Finally just got bigger and bigger breaker bars. Bent all my small ones (if 24" is small) and finally got the big thick four footer out. That finally pried it out. Be very very careful not to crack the timing chain cover when prying. I was so frustrated by this point I wasn't thinking too clearly but I did manage to get it out without cracking anything using the big demo bar. | | | | |
Yes, I'd also gotten to the point of not 'thinking too clearly', and decided to bag it for now - which is not a decision taken lightly as it means taking the bus this week. Thanks very much for the reply - the local OSH is closing, maybe they have a honker breaker/crow bar on special. And also yes, maybe the most frustrating thing I've ever done in a car.......... | | | | |
Need edits to all the bolts posts with proper torque specs. I still haven't gotten a bentley for my ti but I'll look in my other E36 books to see if they have some. But if anyone else wants to do this it would be greatly appreciated. I bought a torque wrench so I can finally do things right but I didn't buy myself a book with proper torque values so my wrench is almost pointless right now. | | | | | Resolved - water pump removal
After reading all the posts here, as well as the Pelican water pump removal comments, I purchased a purpose-made water pump removal tool: http://mysite.verizon.net/res8nm26/bmwtools/index.html I came across this in the Pelican comments - it was made by a father/son BMW owning machinist team. It's an absolutely beautifully made piece - easily OEM quality. Worked like a charm - out in maybe 3 minutes. After trying a claw hammer without any movement at all, I was hesitant to try the very large pry bar method - there are so many posts where have the pump ended up remaining in the block, and with my engine having 185k on it, I thought the smooth pressure of this tool might avoid this result. And so it was! BTW - my car was made in 4/98, and the impeller was unlike any other I've seen here - not plastic, not cast metal, but sheet metal pieces tinned or soldered together. The pump had spat out several roller bearings; engine runs soooo much quieter now. | | | | |
Gotta say that this website in general, and this thread specifically, is really outstanding. So often you get criticism and condescension sprinkled in with the posts when folks who weren’t born with a wrench in their hands ask questions but that is not the case here. Not only a great source for information but even encouragement.
Bought a 95 318ti (8/95 production date M42 engine) for my son turning 16. First BMW ever owned and knew it had cooling problems but otherwise ran well and had only 120K miles. Replaced the radiator and major coolant hoses, belts, water pump & pulley and thermostat and on startup the coolant pipe on the head broke.
With the help of this post I got the nerve to try replacing coolant pipe, fuel injector o-rings, both upper/lower manifold gaskets and the TB gasket and the vacuum hose from the fuel pressure regulator to the intake. I also sprayed cleaner into the ICV but didn’t probably clean it as well as I’ve heard should be done.
I didn’t pull the lower manifold completely off because I didn’t want to mess with the “squid”. I did have to remove all 4 plugs from the passenger side of the squid box so it would rock back with the lower manifold to allow me to install the coolant pipe and hoses. I’m pretty sure I got all 4 clips back into the squid in the correct location but it did take some re-thinking as I didn’t label like I should have.
Bottom line is after the 2nd assembly the engine would turn over but wouldn’t start and stay running unless I pressed the accelerator pedal and get the RPMs up (idled fine before all my “improvements”). From what I’ve read this implies a problem with an air/vacuum leak or the ICV is bad. Checked the OBD1 and have only a 1222 fault which I think was caused by my idle problem causing a rich/lean mixture. I don’t think the fuel pump is the problem. If the injectors/hoses were leaking would the engine be able to run at the higher RPMs?
So I’m buying more gaskets and am going to disassemble again and probably just replace every hose and clean and inspect the ICV closer. I have a fuel pressure tester but don’t think that is the problem (though I don’t hear the fuel pump prime when I turn the ignition key to the on position).
Any other checklist items you might recommend me covering this weekend? Anyone have the specs for resistance on the ICV connectors? Appreciate any feedback. | | | | |
Don't they make a aluminum coolant connector? Why on earth would they use plastic!?!!! | | | | |
Great write up. I recently got a 97 318i MT with cam shaft position sensor error (among many other issues). Since I had to take the intake manifold off to replace the sensor, armed with this write up, I went for replacing all the hoses and vacuum lines, cleaned the intake manifolds, throttle body, PCV, ICV, and had the fuel injectors professionally cleaned/refurbished. Now I am putting it all back together and scratching my head trying to figure out where the knock sensor connector holder bracket should bolt on. who ever worked on this car before had left the bracket hanging loose. Any help or pic of where the knock sensor connector holder bracket mounts would be great. Thanks in advance. | | | | |
First time replacing the radiator on the M42.
A couple observations.
I am probably stating the obvious, but...
parts need to be transferred from the old radiator to the new one.
I realized this when I wasn't happy how the radiator sat in the chassis.
Also remove the vent plug when filling with your antifreeze mixture.
If not water may circulate as is in my case.
I filled the overflow and noticed water not circulating until the vent plug was removed. | | | | |
Looks like I'll be doing this soon since my water pump started leaking Friday, 131000 miles I knew it was coming | | | | |
If anyone was wondering (as I was), replacing the rear coolant connector without removing the intake manifold isn't too hard of a project. Much better than taking off the intake. Remove the battery box, ignition assembly (coil and wires) valve cover and the panel(s) against the firewall - the ones that need to be removed to replace the HVAC filters. The top connector bolt is easily removed from the top with a 10mm gear wrench, but the bottom is tougher. I used a 10mm box end wrench and reached under the connector to access. Some arm contortion involved. Maybe a small 1/4" ratchet and socket would be easier? That might premiss getting at the lower bolt straight down, from the top.
Once the bolts are off you can flex the loose connector and hoses up to gain access to the hose clamps. That's it.
My connector was leaking in the cold. I reinstalled with a good thick bead of permatex ultra grey "outboard" of the o-ring. So far so good. 235,000 miles on the beast. Might be time to retire it in the next 12 months. | | Last edited by CirrusSR22; 11-26-2013 at 07:11 AM.. | | | NEED OF HELP
I am at a total loss guys. I have a 1997 (6/97) Z3 1.9. I ordered from Pelican and AutohausAZ. The coolant hoses from both sites match the part # of my Z,but they don't match up  I will upload some pictures to illustrate. I know I am not a regular, but I have been ill for a while and now I feel I can do it. I learned a few tricks I would like to share with you guys to make access SO easy  I have to have a different production run or something, got any ideas ? | | | | |
i have been reading this thread over and over during my own m44 sedan cooling system overhaul. couple things at the end here have me a bit stumped (a vacume line and a couple wires) if i cant figure it out ill post pics after my attempt. this thread is pretty much the reason i finally decided to make a 318.org account ive been browsing here from time to time. seems like a great forum  i figured out where the remaining lines and wires go thats a good feeling. i got hung up trying to re attatch the throttle cable though and have to go buy a set 90 degree bent alen key style torx wrenches to get the bottom bolt on the throttle cable bracket screwed back in. i got it out with small vise grips and a screwdriver bit but i cant find my small vice grips atm so to the store... lol | | Last edited by e36steve; 02-22-2014 at 08:36 PM.. | | |
| Currently Active Users Viewing This Tutorial: 1 (0 members and 1 guests) | | |
 Posting Rules Posting Rules | You may not post new threads You may not post replies You may not post attachments You may not edit your posts
HTML code is On
| | |
|


 Linear Mode
