 » Site Navigation » Site Navigation | | | | » Recent Threads | looove 04-16-2024 01:18 PM 04-16-2024 01:18 PM 0 Comments, 453 Views | | | lolita porn 04-13-2024 11:45 PM 04-13-2024 11:45 PM 0 Comments, 220 Views | lolita porn 04-13-2024 11:43 PM 04-13-2024 11:44 PM 1 Comments, 141 Views | lolita porn 04-13-2024 11:40 PM 04-13-2024 11:41 PM 1 Comments, 147 Views | lolita porn 04-13-2024 11:38 PM 04-13-2024 11:39 PM 1 Comments, 148 Views | lolita porn 04-13-2024 11:36 PM 04-13-2024 11:37 PM 1 Comments, 143 Views | lolita porn 04-13-2024 11:35 PM 04-13-2024 11:35 PM 0 Comments, 126 Views | lolita porn 04-13-2024 11:34 PM 04-13-2024 11:34 PM 0 Comments, 129 Views | lolita porn 04-13-2024 11:33 PM 04-13-2024 11:33 PM 0 Comments, 124 Views | |  |  |  | |  10-18-2009, 01:27 AM 10-18-2009, 01:27 AM | | | Senior Member Join Date: Oct 2009 Location: VIRGINIA Posts: 324 |  HOW TO: Replace Hood Cowl HOW TO: Replace Hood Cowl
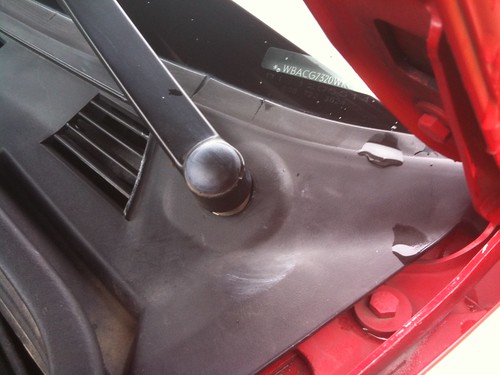 See the black plastic cap at the end of the wiper arm? To avoid unsightly marring, carefully pry it off. You'll need to do this on both the driver's side...
Last edited by MacUser; 10-18-2009 at 01:32 AM. Reason: optimization of the order of the photos |  |  | | |
Now that you mention it, I'm not sure whether new ones came with the cowl pieces. If it did come with new screw caps, that would explain the color match. | | | | |
Gotcha... I'll just figure it out when the order comes in, then report back here for future reference. :-) | | | | | A few notes
I just did this and wanted to add a few notes: - The plastic grating covering the air plenum should be left on as long as possible. This will prevent nuts/washers/etc. from the wiper arms from falling into the vent system. Yes, I did.
- I could have reused all of the clips, but went ahead and installed the new ones since I'd already purchased them. However, there was one weird square-shaped pin that I reused. Maybe that was unique to my car, I dunno. If you see it you'll know what I mean, if you don't see it, it's not an issue for you.
- When you install the new cowl parts, be sure to check the outside edges and make sure that the vertical rubber window weatherstripping is ON TOP OF the cowl parts.
- I also reused the round plastic screw-on caps on the passenger side. The color difference wasn't glaring, but I'll check it later just to be sure. I might add some Forever Black if it's noticeable.
- Total time was about 1:30, but that includes installing cabin air filters and figuring out a way to make the e-bay filters work (and changing clothes once I realized that I was going to get dirtier than planned due to the unforeseen air filter installation). To do just the cowling shouldn't take more than about 30 minutes.
| | | By woh on 06-30-2010, 12:13 AM |
thanks for the write up and comments by others.
Easy yes, but the write up makes it easier yet and quicker. | | | | |
Just did this. Thanks for the write up. | | | By e24l6 on 02-06-2011, 08:07 PM |
need to do this when the snow melts...good writeup! | | | | |
Thanks this is on the "to do" list as the current cowels are totally shot and falling apart. | | | | |
| Currently Active Users Viewing This Tutorial: 1 (0 members and 1 guests) | | |
 Posting Rules Posting Rules | You may not post new threads You may not post replies You may not post attachments You may not edit your posts
HTML code is On
| | |
|


 Linear Mode
